![]()
Sales & Technical: 888-992-9989 | sales@helifix.com


SHARE WITH OTHERS ONLINE…
Click the icons below to share this page on
Twitter, Facebook, LinkedIn, Google+ and Pinterest.


Seismic Connector
Structural upgrade system to meet seismic requirements
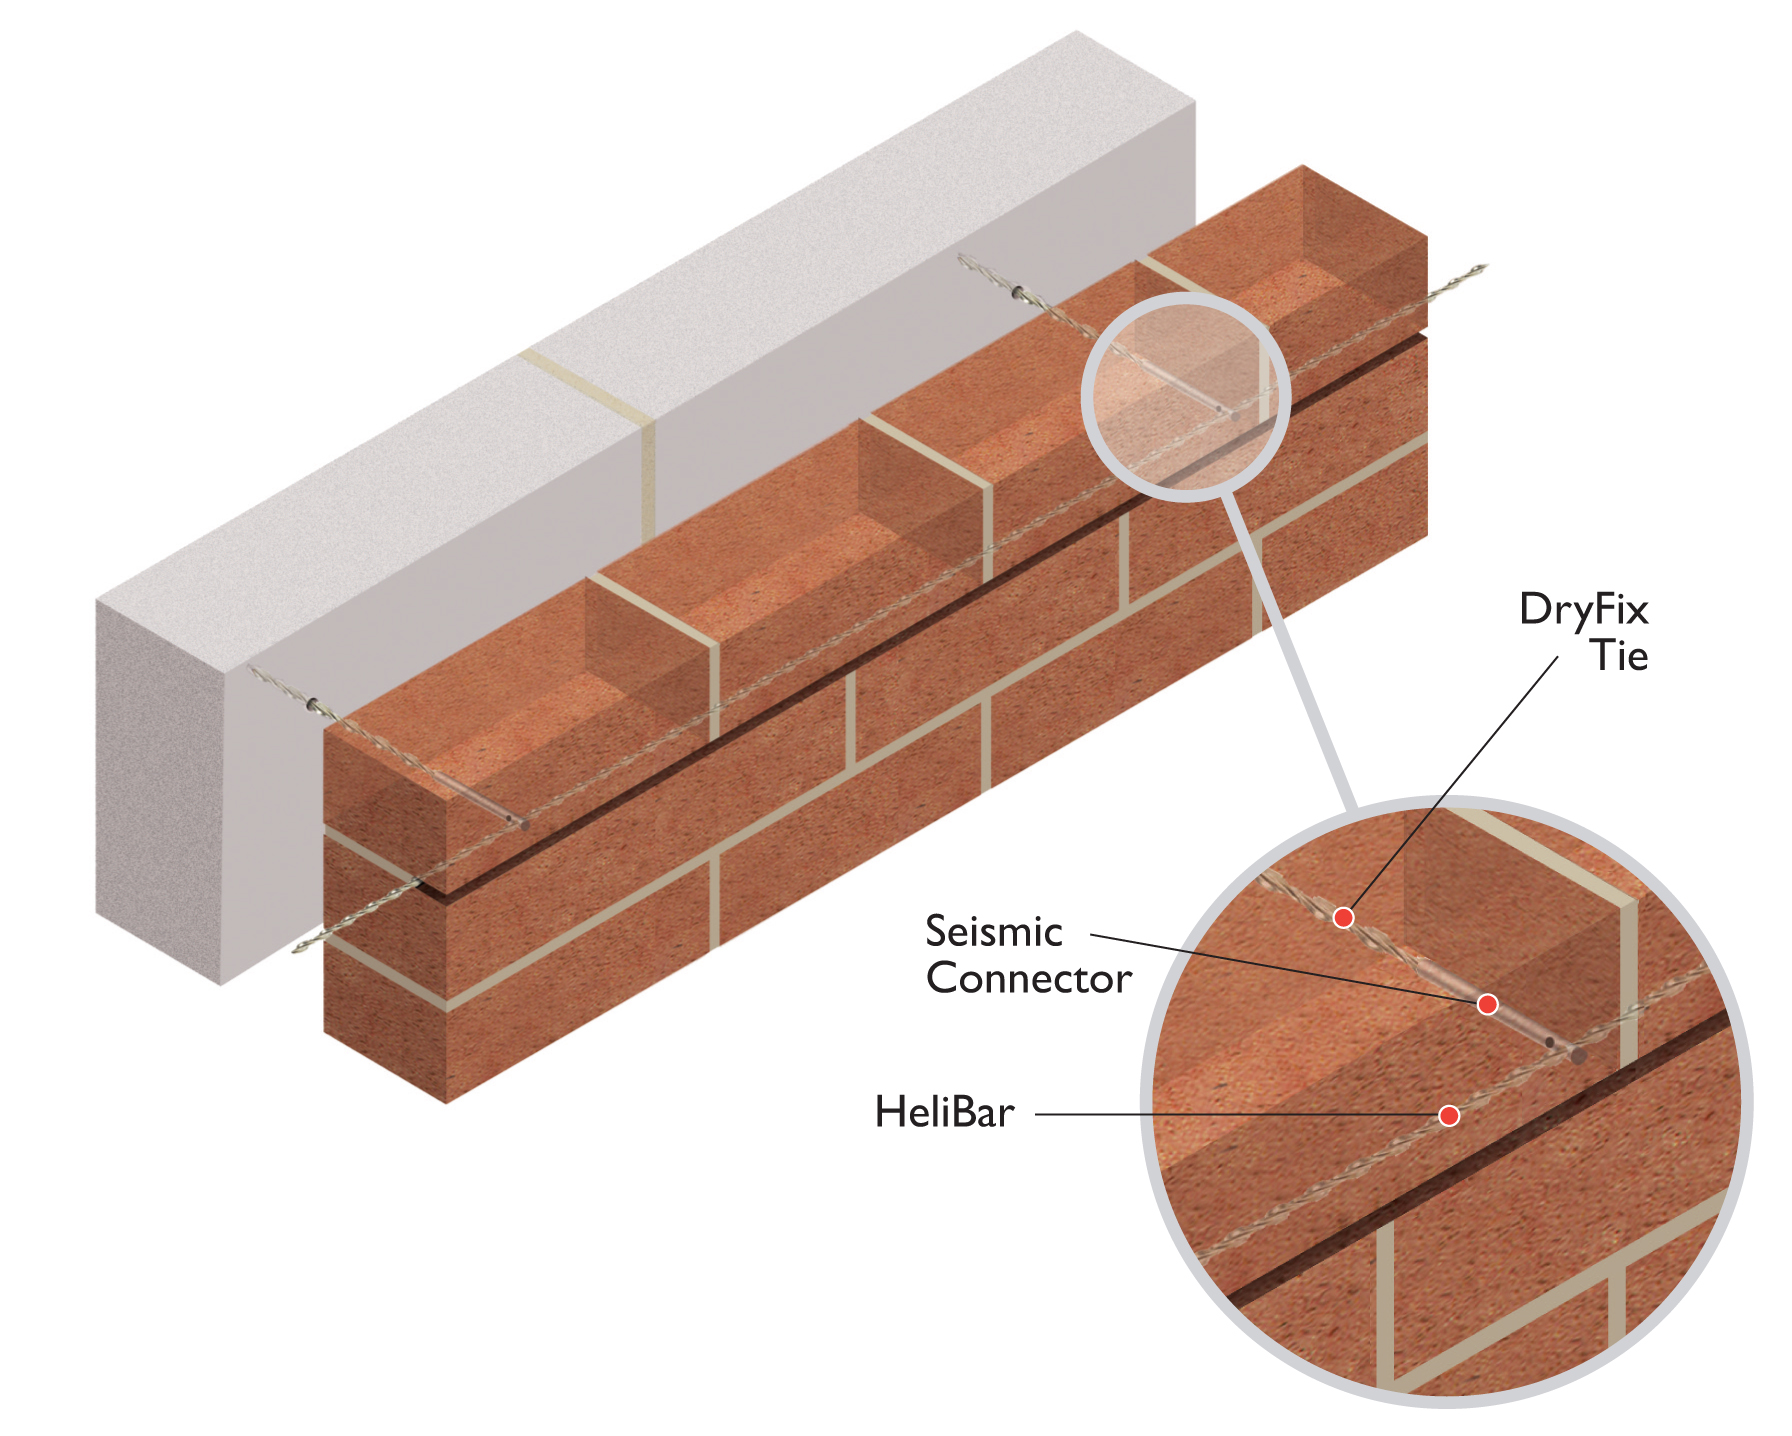
Seismic Connectors enable buildings to meet current seismic standards and restore structural performance. The DryFix system is used in conjunction with a special Seismic Connector fitted to the tie end and connected laterally with HeliBar 4.5mm diameter stainless steel wire which is embedded into the outer wythe mortar. The system is used to strengthen cavity wall constructions in both new build and retrofit applications.
In new build constructions these are installed as the outer wythe is constructed. The tie is driven into the far wythe, the connector fitted to the outer end of the tie and the HeliBar inserted before the next brick course is laid.
Installation Procedure
1. During the construction of the masonry veneer, at the point where a tie is needed, drill an appropriate diameter pilot hole into the back-up substrate.
2. Install the DryFix tie leaving the tie end near the center of the veneer brick or masonry unit.
3. Fit the seismic connector over the DryFix tie. Ensure that it is fully engaged with the tie and that its holes are left horizontal on the outer wythe masonry. Repeat this procedure along the bed joint, at the required spacing, before inserting the HeliBar.
4. Thread the HeliBar through the adjacent connectors. Continuous runs are made by overlapping adjacent HeliBars, by a minimum of 6″, through the two pairs of holes in the Seismic Connector.
5. Apply mortar and complete the wall with reinforcements at predetermined intervals.
6. Tuck point the bed joints.

In remedial situations the DryFix ties are installed, in the standard manner, through the ‘T’ joint of the outer wythe mortar. The seismic connectors are fitted and then threaded together with HeliBar which is inserted into the channeled-out mortar joint and grouted in place.
Most other methods are designed for new construction only and are very disruptive in remedial situations, often requiring masonry to be dismantled and rebuilt. This is not the case with the Helifix system which is the only positive lock seismic connector with easy overlap for long runs.
Installation Procedures
1. Select the points where DryFix ties are to be installed. (Usually at the ‘T’ junction of the mortar bed and vertical mortar joints).
2. Drill a pilot hole, suitable for the back-up material, through the facade and into the back-up substrate.
3. Enlarge the hole through the outer wythe only, to 7/16″, to accept the seismic connector.
4. Cut out the bed joint to a depth of 1 1/4″ – 1 1/2″, using a diamond bladed masonry cutter with vacuum attachment.
5. Make sure NO mortar is left attached to the exposed brick surfaces to ensure a good mortar bond.
6. Remove all dust and mortar from the slot and thoroughly flush with clean, fresh water and leave the brickwork damp.
7. Using the installation tool, drive the DryFix ties into the back-up substrate, leaving the tie end near the center of the outer wythe brick.
8. Fit the connector, ensuring that it is fully engaged with the tie 1/2″ – 3/4″ below the face and its holes line up horizontally.
9. Thread the HeliBar through the adjacent connectors. Continuous runs are made by overlapping adjacent HeliBars, by a minimum of 6″, through the two pairs of holes in the Seismic Connector.
10. Inject HeliBond grout over the HeliBar to the back of the slot and fill the slot. Firmly compress the HeliBond using a HeliBond Insertion Tool or finger trowel, ensuring that the HeliBar is completely embedded, and leave 1/2″ to 5/8″ for matching tuck-pointing.
11. Tuck-point the joints with matching mortar.

- Simple and straightforward to install
- Non-disruptive – requires no tear down and rebuilding
- Strong, reliable connection with back-up material
- Additional strength created in outer wythe
- Positive lock with easy overlap for long runs
- Fully concealed and visually sympathetic
Submit an Inquiry
Download Product Info
Submit an Inquiry
Other Helifix Websites


Contact Us
Leviat - Hazleton, 565 Oak Ridge Road
Hazle Township, PA 18202
United States of America
Main Telephone: (800) 550-0060
Email: sales@helifix.com
Keep in Touch
Join our mail list for regular product updates, upcoming events and technical advice.
Register for E-Mail Alerts© Leviat. Registered Number 210138